I learned to sew when I was 12, and made almost all of my clothes going through school and college. But after I met the charkha when I was in grad school in the early 1980's, the poor sewing machine started collecting dust. So it is unusual for me to be inspired to sew; I usually have my sister do that part. But these napkins spoke stripes to me, and they are simple to make. I used 2 sets of fat quarters, one for the tops and one for the backs. The tops are pieced, the backs are not, so you could use any backing fabric that pleases you. First I dyed the pieces in a bath of avocado pits and skins. The pits were soaked in an alkaline solution for a few days, then the skins and some more water were added and the pot was brought to a boil. The heat and alkalinity bring out the reds. In a hot dyebath, the fabric only needs about 10 minutes to get as dark as it will get.
I got the napkin idea from a Pinterest post that took me to a Purl Soho tutorial.
My modifications are:
- I used Dye-Lishus® cotton, of course
- I dyed the fabrics before cut & sew; I also dyed about 15 yards of 20/2 yarn for topstitching
- I topstitched the long diagonal
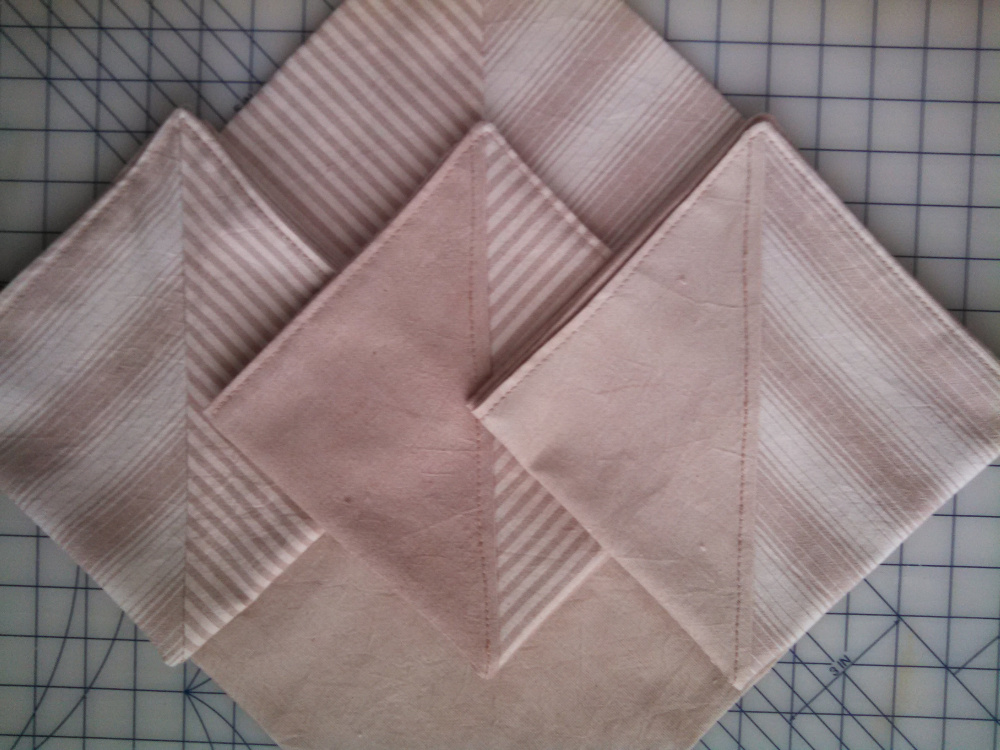
- I made 4, not 8 napkins
- The backs can all be different if you use a second set of fat quarters
Of course you can make your own variations. I first thought I would use the stripes and the semisolid for the tops, but then thought I should show you what the tops look like if you use just one set of fat quarters. So there are pairs that are the same, 2 with the semisolid as the large triangle and 2 with the pixelated as the large triangle.
Here's how:
- Dye the fabrics
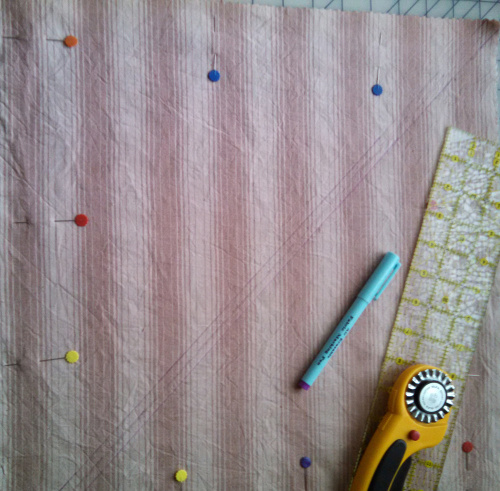
- Place the 2 striped fabrics on top of each other and cut to make square.
- Pin the fabrics together
- Mark the diagonal
- Mark 1/4" on either side of the diagonal; this will be the stitching line
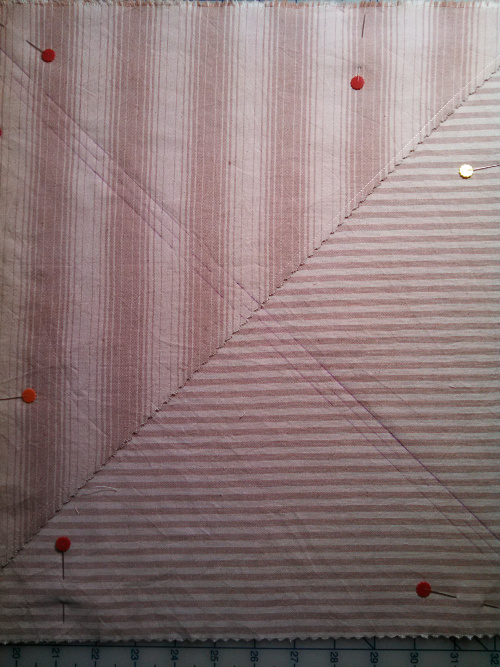
- Stitch on both stitching lines
- Cut on the marked diagonal between the stitching lines
- Open the new squares out and press seam to one side.
- Place one square, seam up, on the semisolid fat quarter and cut the semisolid to match the striped square
- Mark the diagonal perpendicular to the seam on the striped piece
- Mark 1/4" on either side of the diagonal and stitch on those lines
- Cut on the diagonal marking line between the stitched lines
- Open both fabrics and press the seam toward the semisolid fabric
- Repeat steps 9-13 using the pixelated fabric
- You now have 4 tops. Topstitch the long diagonal seam corner to corner
- Place each top on the backing fabric and cut the backing to match the size.
- With right sides together, stitch around the squares, leaving a 3" opening. (Dye-Lishus® cotton does not have a right or wrong side unless there are seams)
- Trim the corners and turn the napkins inside out, then press
- Topstitch around the edges. I used the dyed yarn--it actually goes in the sewing machine needle.